


This peony plant is 3 feet in diameter and hasn’t been divided in a quarter-century. Dividing it will provide new plants and rejuvenate the parent plant. ANDREW MESSINGER
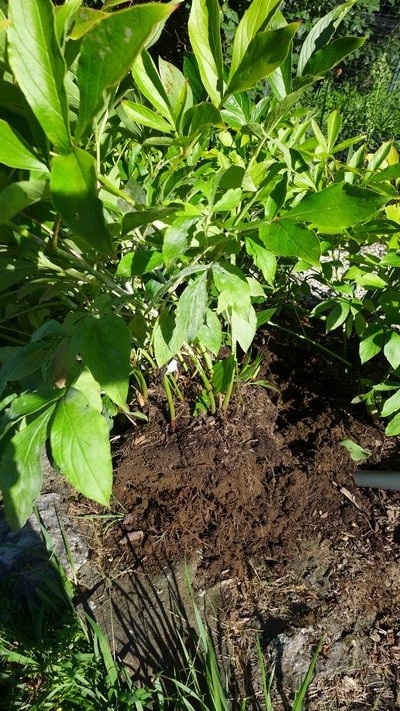
Dig from one side using a tine fork and spade. The plant is gradually loosened around the circumference below the soil, then spaded and lifted. ANDREW MESSINGER

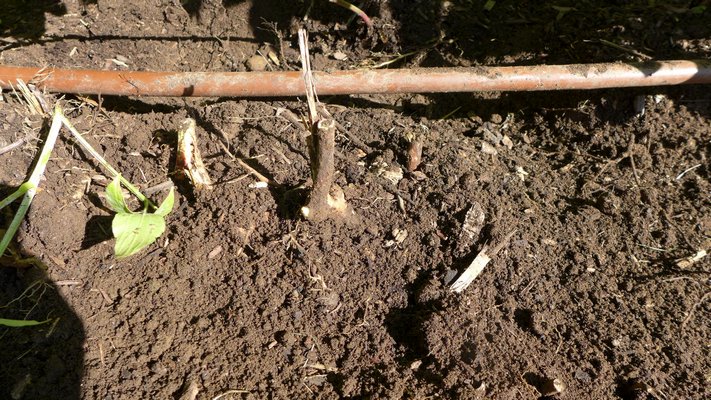
Once the soil has been carefully removed the roots, rhizomes and decayed sections are exposed and ready for trimming and division. Note the "bud eye" at the base of the stem on the lower right. ANDREW MESSINGER
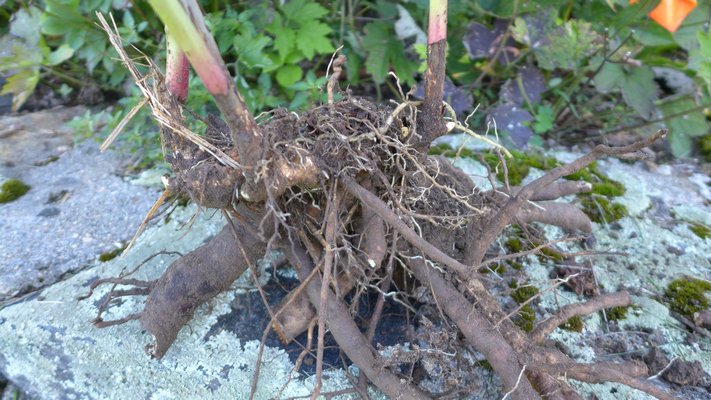
This is a three-eye division with two of the eyes showing on the bottom of the stem on the far right and far left. The third eye is on the opposite side. ANDREW MESSINGER
Loose Amaryllis bulbs start at around $13 in a range of colors. Don't forget the pot and soil though.
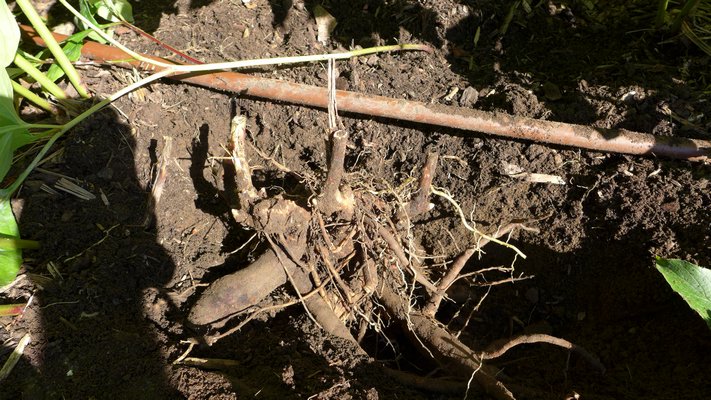
Planted and ready to be watered in. Note the bud eye in the center peeking above the soil. If the bud eyes are buried with soil and not near the surface, the peony may never flower. ANDREW MESSINGER

Even with a few weeks of summer left I broached the topic of fall planting last week and I’m going to continue on that theme this week. But before I get into the particulars there is a convergence of geographic and meteorological factors that play an important role in all this and it’s one of those things that makes the Hamptons unique.Since the 18th century, eastern Long Island has been known for its incredible growing conditions. Jutting out into the Atlantic Ocean and close to the Gulf Stream, our climate is tempered by the warm waters that flow up and off the Atlantic coast. This keeps some areas of the East End up to 20 degrees warmer in the winter than corresponding mainland sections of New York with the exception of the Pine Barrens which can get much colder. This marine influence also give us generally long and mild falls. But, in addition to our climate being tempered by the Ocean there are other influences that meteorologists have known about for years that result in the East End getting the highest quality and quantity of sunlight in the entire state.
Add all this together and figure in the fact that climate change has given us an extra week of gardening in the spring and again in the fall and you have one gloriously long planting season with a prolonged fall that’s just perfect for planting and transplanting.
Now most of us are not going to go out and dig and move trees and shrubs. We leave that up to landscapers who can usually handle these larger jobs much better than we can. But when it comes to the perennials in our gardens, the next six weeks is a bonanza of opportunities to move plants that are in inappropriate locations and to divide and multiply plants that can cost $10, $20 and up to $40 and more apiece at the garden center, but can be divvied and multiplied at home at no cost and just a little toil.
Last week I mentioned dividing irises, as these are traditionally done in late August and the next plant that we can work with are the herbaceous peonies. When these plants grow in the same spot for years on end, the number of blooms can diminish, or shade can take over the planting area and the plants need to be moved. The process is easy, you’ll get great payback in terms of rejuvenated blooming plants in one to two years, and you can double or even triple the number of plants. But mess up one little step and you’ll get nothing but green leaves and no flowers.
Peony rhizomes, often confusingly called roots, grow just below the surface of the soil horizontally as well as vertically. When you dig your old plants you’ll notice this or when you receive new plants in the mail keep this in mind. If the rhizomes are growing only horizontally they should be replanted that way, but you’ll probably note that they go in both directions.
When you dig the old rhizomes they will need to be cleaned up. Use a tine fork or trowel to dig the rhizomes, trying not to spear them. Once they are lifted from the ground, trim off dead or decayed sections, and remove any soil, but try to keep as many of the roots intact as you can, even though there will be only a few. Trim off the foliage but leave a few foliage stalks of 2 to 4 inches so you know which is “up.” Now look carefully at the rhizome sections. Try to locate the “bud eyes” just above the rhizome mass. These will be pinkish white protrusions about a quarter- to a half-inch long. This is where next year’s growth will come from.
Ideally, each new rhizome section that you are going to replant will contain three to five of these bud eyes. A five-eyed section will result in a larger plant that may throw out a flower or two next year, while a three-eyed section may take two years to flower. Use a sharp knife when you make your cuts, and once you have your sections cut, allow them to air-dry for an hour or so before replanting. This allows the cuts to cure a bit.
The new rhizome sections should be planted in soil that isn’t sandy, and you can add some aged compost but no manure. The soil should be loose and friable and worked down to about 8 inches. The planting area should be in full to slight shade but not in full shade, and keep in mind that peonies like to stay in the same place for years and years—so also consider how the trees and landscape might shade them in the years to come. The rhizomes are then planted so that bud eyes are just barely … again, just barely, covered with soil, maybe even peeking through and always planted with the bud eyes facing up (stems stubs up) or at least as many as possible facing up.
Once they are planted, simply water them in with a watering can, and don’t add any fertilizer though a biostimulant can be added to the water. Water one or two times a week if there’s no rain, and that’s it. Deer won’t eat them, bugs won’t bother them and they never need feeding. Never mulch them, though, and never use manure around them, because both will lead to disease issues like botrytis, which causes new spring growth and the flower buds to get moldy and drop off.
For beginners who want to try their hand at propagation, you really can’t go wrong with day lilies or Hemerocallis. First, cut back the foliage to about 6 inches, then dig up the clump or divide a clump with a spade. The clump can be divided into smaller sections with a 1-foot-diameter clump yielding four large divisions. Dig a hole to accommodate the division, plant at the same depth that it was originally growing at (never deeper and when in doubt higher), fill in, water, and that’s pretty much it. Again, water if there’s no rain and don’t fertilize.
Many hydrangeas can be divided and moved in the same manner. Once flowering has stopped (or sooner), reduce the plant to 1-foot stems and dig around the crown so the crown can be lifted out of the ground. But before you lift the crown, use your spade to divide it by shoving the spade into the crown to divide it in half or into quarters. Remove the divided sections, replant at the same depth as the parent, water in, and you’ve got two three or four hydrangeas for the price of one.
Tall garden phlox or Phlox paniculata can also be moved and divided in pretty much the same way. Once flowering is finished, reduce (prune) the plant back to about 1 foot tall, then dig around the circumference of the crown. Again, while the crown is still in the ground, use your spade to make divisions by pushing the spade straight down into the crown. Each division is then lifted and replanted.
With the phlox you can get four to eight divisions from a 12-inch or larger crown, and they will flower the following summer. But if you want even more plants here’s a little trick. When the plant is finished for the year, take a bulb planter and force it down into the phlox crown right in the center. That’s it. Come spring, watch the soil, and you’ll see dozens of new phlox plants emerging from the crown. Each one can be dug, transplanted and will result in a larger flowering plant the following summer.
There are literally hundreds of perennials that can be divided and propagated in your garden at little or no cost. Late August into September is the time for most of them. Got a question? Ask. Keep growing.
More Posts from Andrew Messinger


