


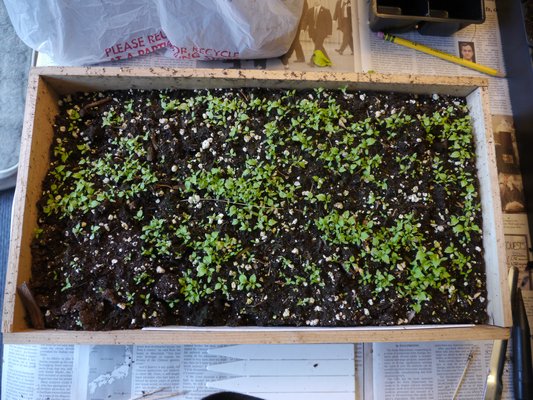
Seed starting mixes need to be moistened before use. Add the mix to a container, pail or plastic bag and add small amounts of warm water until the soil is moist, never dripping wet. ANDREW MESSINGER
This peony plant is 3 feet in diameter and hasn’t been divided in a quarter-century. Dividing it will provide new plants and rejuvenate the parent plant. ANDREW MESSINGER
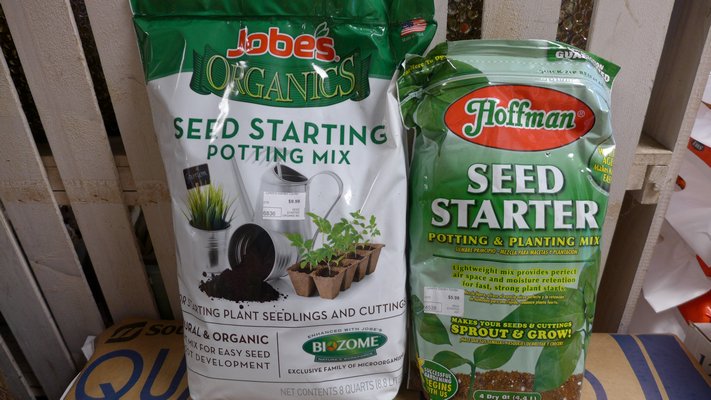
You may find up to a half dozen seed starting mixes. Experiment with small bags until you find a brand that works best for you. Don’t be fooled by the "organic" label, though. By their nature, seed starting mixes are all organic. ANDREW MESSINGER
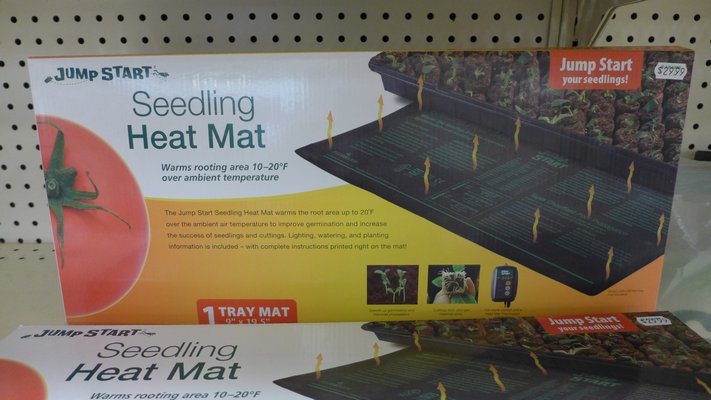
Inexpensive heating mats like this one are designed to go under standard-size flats and cell packs or other containers. The mat will maintain soil temperatures optimal for germination. ANDREW MESSINGER

Why in the world would anyone want to grow a plant from seed when you can go to the garden center and buy the plant in a cell pack or a pot ready for planting?Well, you can get some vegetables, bedding plants and perennials at garden centers or by mail, but in many cases you may want a very particular plant that you’ve seen in a catalog, read about in a magazine or seen in a garden that isn’t available as a started plant. After all, garden centers can carry just so many marigold varieties, tomatoes and cucumbers, but if you look in the catalogs, there are literally dozens and dozens of varieties that you can grow only on your own.
Ah, but do you know how? Have you tried home seeding just to find that the seeds sprout, only to die days later? Have you planted seed that failed to germinate? And did you know that some seed—mostly perennials and trees—can take months to years to germinate?
Growing plants from seeds is a skill. It’s something that anyone can learn to do at home, but as with any skill you need to know the basics, then work up from there. And now is seed-starting time, so this week and next we’ll cover what you need to know to get started and be successful.
If you’re new to seed-starting you should start with things that are simple, and as you gain confidence and understanding on how this process works you can take on more complex projects and challenges such as vernalization or stratification and growing ferns from spores. You can save a ton of money by starting your own plants from seed, but the first lesson is that not every plant can be grown from seed. The production of plant seeds is a sexual process in which two elements are brought together to produce a seed. That seed contains the genetic material from both parents and usually produces a plant similar to its parents. Usually. There are surprises just as in the rest of the reproductive world where there are mutations and variations.
But there is another type of plant reproduction that we’ll touch on only briefly here, and that’s vegetative reproduction. Here, no seed is used, but a plant part is severed from the parent and in one of several ways the part—a stem, a leaf or a root—is used to regenerate a new plant. What method is used depends on the plant you want to reproduce. Since not every plant produces seed there are some times when this is the only method of reproduction available for us to use. It is in essence, cloning. But the more modern definition we usually apply to “cloning” is when we get down to the cellular structure and reproduce plants from just a few cells. It’s this type of cloning that has allowed the new popularity in orchids to flourish, as thousands of easy-to-grow orchids can come from clones that are started in petri dishes in labs.
Most of us won’t get into this technical type of cloning, yet if you go into your garden this spring and divide a hosta or astilbe, you are multiplying your plants by vegetative reproduction that, again, is a simple form of cloning. Each division that you make will be an identical clone of the parent. The same holds true if you root a stem of a coleus, grow a new Rex begonia from a leaf cutting or take a side slip from a garden primula.
One other thing to remember about seeds, though. If you are growing a flower or vegetable from seed and it’s listed as an F1 hybrid (F1 meaning first filial—the first generation from different parents), you will not be able to collect seed from that plant and grow more. If any seeds are produced, they will be sterile (referred to as “mules”) and won’t germinate. This is due to the way in which the seed is produced by the pollination of the two parents. That’s what makes them hybrids, and in most cases the crosses are done by hand, which explains why this seed is usually more expensive than open pollinated seeds, which are often our heirloom varieties.
So, you want to grow some plants from seed. What will you need? The first thing you need is light. Sunlight will be necessary later on when we do transplanting, but what you need in the early stages of seeding is bright light. This can be found near a sunny window—but not in full direct sun—or under artificial light.
Why not on a sunny window? Because emerging seedlings can be burned in full sunlight and the sun can also heat the soil to the point where the emerging seedlings can wilt and die. The exceptions here are some of the vegetables like tomatoes, peppers and others that don’t mind the warmth of a sunny window as long as you don’t let the soil dry out. If finding the right spot for getting your seeds started is difficult, then you can use a grow light. These can be fluorescent, compact fluorescent (CF), LED or other lights that are produced specifically to generate the wave length and color that seeds need to grow in. This type of lighting is available at many garden centers and in most seed catalogs. The set-ups can be very inexpensive, as in $25, or as much as $500 for large growing areas.
Once you have an area set up as your germination area, you need the supplies for sowing your seeds and getting them to germinate. Now, one thing to get out of the way, but it’s critical. Not all seeds need light to germinate. Some seeds are light germinators, while others need dark and some couldn’t care less. Those that need dark are simply covered with soil. Those that need light are just put on top of the soil. Those that don’t care, don’t care.
Seed catalogs will usually indicate which seeds need light, dark or are neutral, but when in doubt find out before you sow. Most vegetable seeds are dark germinators and the instructions will tell you how deep to bury or cover the seeds. But if you cover a columbine seed, it will never germinate.
Now you need a “medium” or soil to germinate your seed in. Most of us use a commercial packaged germination mix, and there are plenty to be found. Rather than buying a large bag, buy several small bags from a few different brands and see which you like best. There should never be any fertilizer in germination mixes, so don’t use regular potting soils, and never use soil from the garden, as garden soils can contain pathogens that can kill emerging seedlings. Most if not all germination mixes will be innately sterile due to the materials that are in them like peat, vermiculite, perlite and sand.
Once you have your medium you need something to put it in. If you are going to want lots of plants, say four dozen marigolds, you will want to use a germination tray or box. If you want only a handful of plants, like peppers or tomatoes, you can use pots instead. For most flowering plants and vegetables, the type of pot doesn’t matter, but for cucumbers, melons and squash, peat pots are best because there is no root disturbance at planting time. When the plants are ready to go into the garden, you plant the pot and all. Since the pot is peat-based, it breaks down quickly in the ground and there’s no transplanting or root disturbance.
So you have your medium, you have your seeds and you know if they are light, dark or indifferent germinators. What you probably need now is called a “flat.” A standard plastic flat is 11 by 22 inches and about 2 inches deep. You can also use wooden flats made from cedar, and these will last for years, while the plastic flats will last about two years unless they crack sooner. There are two types of plastic flats. One type has drainage slots on the bottom and the other has no drainage. The slotted flats are the best for germination.
You can fill the flat with medium or you can buy cell packs that fit into the flat and seed directly into the cells. Sowing very fine seed into cells can be nearly impossible, so for these seeds you need either a half-flat, a nesting tray or you need to be creative.
Next week: getting things going and growing. So get your flats, germinating mix and seeds ready, and next week we’ll get you germinating. Great project to work with kids on, by the way. Keep growing.
More Posts from Andrew Messinger


