


To move from a four-inch pot to a six-inch pot, first fill the bottom of the six- inch pot with soil so the four-inch pot rests one-half inch below the six-inch pot's rim. ANDREW MESSINGER
Next, fill the six- inch pot with soil and tap the pots lightly until only the rim of the four- nch pot is visible. ANDREW MESSINGER
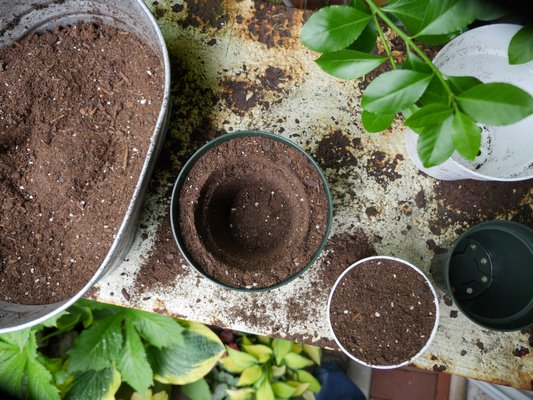
Pinch the rim of the four-inch pot and lift it from the six-Inch pot. The depression left behind will allow a perfect repotting from a four-Inch pot. Fill in with soil as needed, leaving a half-inch space from the top of the pot for watering. ANDREW MESSINGER
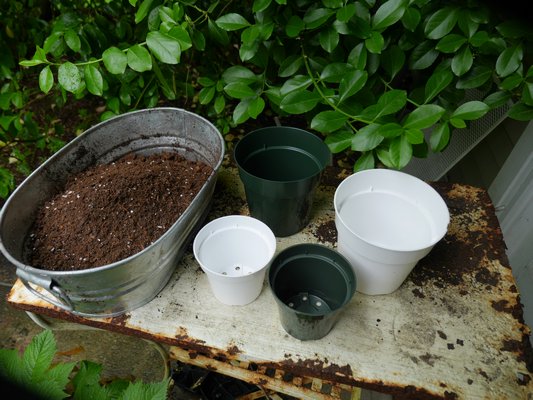
The potting essentials: potting soil and pots. Pots in the rear are standard six-inch pots and pots forward are standard four-inch pots. ANDREW MESSINGER

Continuing with last week’s topic on repotting, we find that pots are usually classified as standard, azalea and bulb pans. The diameter of a standard pot, by far the most widely used, is almost the same as its height. An azalea pot is slightly wider than it is tall, and a bulb pan has a larger diameter compared to its height. Azalea pots are used for plants with shallow root systems, while bulb pans are used mostly for forcing spring flowering bulbs.The one golden rule of repotting is to avoid pots that do not have drainage holes. Plants can be grown in such pots, but the procedure becomes far more difficult and demanding. Fortunately, most manufacturers of decorative pots are aware of this and provide drainage holes, but many imported pots may be ... “unholy.”
More important than what the plant is put in is how it’s put in it. Repotting requires patience, and the mere thought of it often throws beginning gardeners into a nervous state. Relax—it can be incredibly easy.
Before repotting any plant, water it thoroughly four or five hours before. The soil will be moist enough to slide out of the pot easily (most of the time) and hold together around the roots.
Choose a new pot that is one to two sizes (usually inches) larger than the one in which it is presently growing. If the new pot is too large, the excess soil will retain too much moisture, thus increasing the danger of root rot.
Prepare the pot by using broken crockery (pieces and shards of broken clay pots), pebbles, or large-sized gravel or pea stone to form a thin layer on the bottom for added drainage. Pots 3 inches and smaller in diameter won’t need this step. For larger pots and plants, make this layer thicker, up to 1 inch or more, and you’ll never be stuck with a waterlogged pot, unless you submerge it in water. For plastic pots, you can usually eliminate the crocking step, because these pots have multiple drainage holes. But, again, if you tend to be a heavy waterer ... the extra drainage can’t hurt.
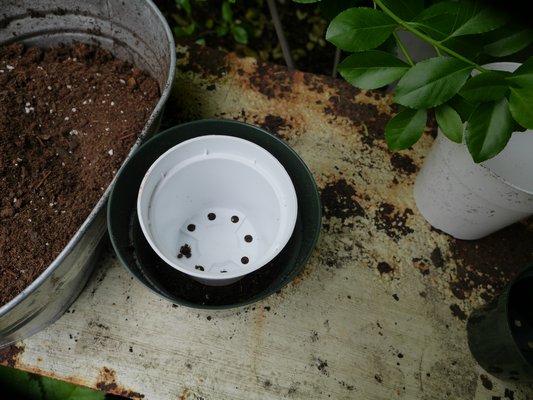
Put a layer of potting soil on top of the crocking; to determine how thick this layer should be, put the plant, in its present pot, into the new pot. This will give an idea of how much soil to add. Try to allow about a half inch between the pot rim and the top of the soil to facilitate watering.
Now invert the plant in the old pot, and hold the plant by placing your fingers around the stem of the plant while supporting the soil. Your hand should be flat against the soil, with your index and middle finger on either side of the stem. Gently tap the pot, and with a wish and a prayer, the plant (with soil intact) will fall right into your hand. If at first you don’t succeed, try tapping the pot gently against a table corner or with a trowel handle ... but sooner or later you’ll get a pot that simply has to be broken ... it happens. If the plant pops out and all the soil falls out … then that’s a pretty good sign that the plant didn’t need repotting.
If you have a plant in a plastic pot that just won’t come loose, the pot may have to be cut. This can be done with a very sharp utility knife; I’ve been known to heat up the knife to melt the plastic and speed up the process. If you can’t dislodge a plant from a clay pot, the pot will have to be broken. It’s simple enough to do with the rap of a hammer or stone—but remember to save the old pot for future drainage pieces.
Before putting the plant into its new pot, gently disentangle and tease the roots out, or they will continue to grow in circles. If this is difficult, you can cut two to four slits, top to bottom, along the root zone (the plant won’t scream, I promise) and then place it in the new pot and fill in.
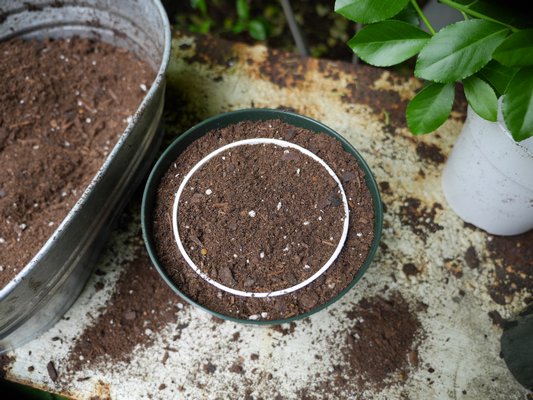
A little trick at this point is to take the old pot and place it inside the new pot, and simply add soil in the open space and firm it gently. Then lift the old pot out—and you have a perfect mold for the old plant in the new pot. Gently firm the soil around the ball, but DON’T compact it, and water thoroughly.
Set the plant away from sunlight for a few days so it can recover, and don’t feed for at least six weeks, as the new soil should be quite fertile. A little secret is to take a small amount of organic garden soil or compost from outside—a teaspoon to a tablespoon will do—and add it to the potting mix. This adds soil microbes that are absent in the packaged potting soils and adds “life” to the soil.
It was once difficult to get good terra-cotta pots to use outdoors, but they’re now plentiful and being produced in Italy, Mexico and here in the States. But you can’t leave soil in these pots outdoors during the winter. The soil becomes waterlogged, it freezes, expands, and your very expensive and beautiful pot splits and becomes useless. But most of these pots can safely be stored outdoors over the winter.
At the end of the season, and before we get freezing nights, the pots need to be emptied and cleaned. The pot then can be turned upside down and stored on wooden blocking. It’s critical that the pots don’t come into contact with the ground, and there must be wooden blocking between the pot rim and the soil. It’s also critical to turn the pot upside down so it can’t hold any water.
With very heavy urns or concrete planters that can’t be turned upside down, it’s critical to keep the drainage hole free and clear all winter, so water can’t accumulate in the pot and crack it. We make a small cylinder of screening or mesh for it 6 inches long and insert it into the drainage hole, having learned that leaves blocking these holes can be catastrophic when they block melting snow that turns to water that refreezes … and cracks the pot.
As for potting soils, my current favorite is Espoma. Very slightly moisten the potting soil before using it so the peat base of the mix will absorb water instead of shedding it. Try to stay away from soils that have fertilizers added, as you never have a good idea when the fertilizer “charge” has lost its nutrient value. For most, it’s not practical to make your own potting soil, but it can be done. You can also purchase potting soils specially blended for cacti and African violets.
If needed, sharp builder’s sand (not beach sand) can be added to the mix if you need a quick-draining soil. For those who want to go without fertilizing for many months, a small amount of Osmocote for houseplants can be added to the potting mix (a little goes a long way), and you can then go the whole summer without needing to feed.
Repotting is a great weekend or afternoon project that will help you and your plants keep growing.
More Posts from Andrew Messinger


