


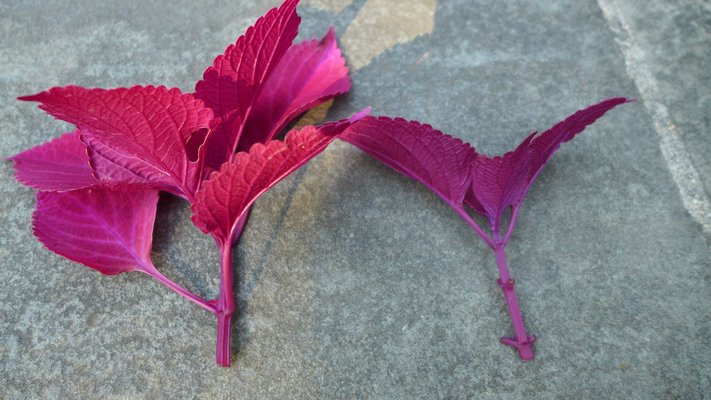
Coleus cuttings, taken early in the morning so they remain turgid. The cutting on the right has been trimmed of its bottom four leaves, where a rooting hormone will be applied, while the four upper leaves remain. ANDREW MESSINGER
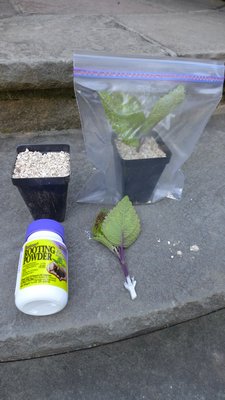
A 2-Inch plastic pot filled with vermiculite, top left, and a coleus cutting, bottom right, dusted with the rooting hormone. The cutting is struck into the damp vermiculite and the foliage misted, then placed in a plastic bag. Rooting will take 10 days to 2 weeks. ANDREW MESSINGER

Last week when I began the topic of plant propagation, I mentioned coleus a number of times. Aside from my affinity for this plant, it’s one of the easiest to propagate and experiment with since it will often root in just a couple of weeks when the cutting is taken from the correct place and prepped properly. So for beginners, grab your coleus and multiply, then move on to more difficult plants.In order to root your cuttings you usually need to dip the cutting into a liquid or powdered rooting hormone that stimulates root growth. These preparations come under trade names like Hormonex and Rootone and are available in small foil packets or small plastic jars. Some contain a fungicide that reduces the chances of bacterial and fungal rot in the warm and moist rooting media. There are also liquid hormones that claim to be more successful than the powders. The hormone is applied by lightly dusting or dipping the cutting only on the length of stem that will be struck in the medium. First, one or two of the bottom leaves are removed, the stem dusted with a fine brush or dipped in the jar or packet. The excess is then shaken off the stem, as only a light coating is necessary. The hormone stimulates the roots to grow at the point where the leaves have been removed by telling the cells in that area to become root cells instead of shoot cells.
Next you need high humidity, and some bottom heat helps as well but isn’t always necessary. You can buy domed plastic trays, small propagation houses (about the size of a standard flat or 11 by 22 inches) or simply use a plastic bag. In a tray, cell pack or very small pot add sand, vermiculite, perlite or a propagation mix made of peat moss, perlite and vermiculite. This is your “medium” and it should be lightly moistened, not dripping wet. Never use soil from outdoors as it will contain pathogens that will induce rotting, and never use a potting soil that has fertilizer in it, as this will burn any roots that try to form. Using a pencil or dibble, make a hole down into the medium to the depth of the cutting that you are striking. Depending on the plant, roots will initiate either where you took the leaf off or where a callus forms at the cut end. Don’t push (you’ll rub off the hormone), but gently put the cutting into the hole and gently firm around the cutting.
Next, take a misting bottle (any spray bottle will do as long as it’s clean and contains only water) and gently mist the foliage of the cutting(s). Place the dome over the cuttings or if you’re using a pot and a plastic bag put the pot in the bag and close it (zipping bags work great), making sure the bag doesn’t touch the cuttings. Place the whole setup in a bright area but not in a place where it gets too hot or where the sun will hit it. The sun will bake your cuttings and since they have no roots yet they are unable to deal with the water loss caused by the bright light and heat.
For the best results you’ll need a source of bottom heat as the soil temperature should be a constant 68 to 72 degrees. In the summer this can usually be accomplished in a warm spot in the house but at other times of the year we use heating cables, heat mats and other methods.
Now, the trick is patience. Depending on the plant you’ve taken the cutting from, rooting can take from two weeks to months ... but your coleus and geraniums, good plants to experiment with, should root in a couple of weeks. Mist the cuttings very lightly at least once a day, as mist on the foliage reduces transpiration and wilting. The soil should remain moist but not wet and you should never pull the cutting to see if it’s rooted. Control yourself. In time you’ll learn how long any given plant will take to root at certain times of the year ... then you’ll know when to give that testing tug.
Silver-leaved or hairy-leaved plants such as the beach wormwood should not be misted, and you may find that they will root better without the use of a hormone dusting. Plants like this seem to root well in coarse sand and at a higher temperature. You’ll also find that leaves from jade plants will root simply when placed on damp sand. “Pups” or side shoots from the aloe plant can simply be repotted, and the “spiders” from spider plants can be pressed onto damp soil and they will root with virtually no effort. Even some garden lilies create aerial bulbs at their leaf axils and these too can easily be removed and rooted on damp soil.
Once your cuttings are setting roots (they will resist your most gentle pull) reduce the humidity by opening the bag over a period of a few days or vent the dome beginning in the morning and evening. Then, when you see that the cutting remains turgid (rigid), the dome can be removed. When well rooted, transplanting can take place and you can begin light liquid feeding, preferably with an organic material like fish emulsion or another low-nutrient organic fertilizer.
In the case of perennials like the hibiscus, rooting will take longer, and by the end of the summer you may have a plant with only a dozen or fewer leaves and a very tender root system. If you were to plant this out in the garden at this point, the roots would not be hardened enough or mature enough to make it through the winter. Cuttings like this and those from vines like clematis should be overwintered the first winter in a cold frame where temperatures will moderate and not kill the new roots.
The idea with plants like coleus and geraniums is to create “stock” plants that you will grow through the winter, making them stocky and lush with terminal growth. This is accomplished through successive pinching or pruning, which also forestalls flowering. In late winter cuttings are again taken and rooted and it’s these cuttings that will be your planting-out material for next summer’s garden.
Once you’ve mastered the easier softwood cuttings it’ll be time to take the next step and move on to techniques like layering, air-layering and taking woodier cuttings. These all take longer than rooting something like a coleus, but you’ll be able to make your 10-foot-tall dracaena marginata a manageable 4-foot plant again or that tall and forever leaning dieffenbachia a nicely tamed living room guest.
Some gardeners get really hooked and they set up propagation chambers, hotbeds and cold frames that allow them to propagate just about anything, including trees and shrubs. With the more advanced techniques you can start a rhododendron or azalea collection and your choices of plants will be limited only to the plants that you can get access to to take cuttings.
So, go forth and propagate. Beware of plants that may be patented or have copyrights, as the commercial propagation of these plants can get you into hot water. For your own personal use at home, though, rooting a few cuttings won’t get you into trouble. And remember to check out this link http://goo.gl/WZQNVl. Keep growing.
More Posts from Andrew Messinger


