


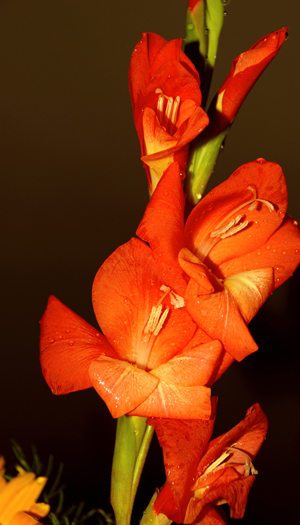
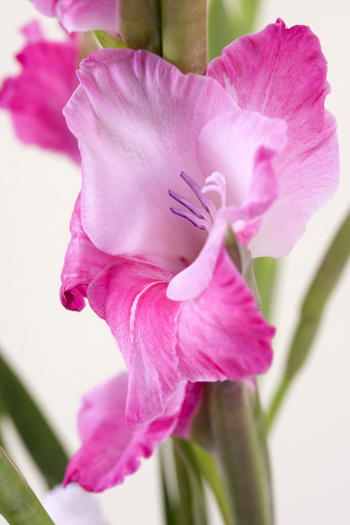
Gladiolus
As you might have noticed, gardening trends and fancies are cyclical in nature.
Plants and techniques go in and out of favor just like fashions, cars and artwork. There are booms and busts, but in the end everything seems to come back again.
I think such is the case with gladiolus. I can remember when they were in just about everyone’s garden, though often relegated to the very back or staked in a back cutting garden. But they’ve disappeared.
I think gladiolus came to be looked upon as too common, even, possibly, as too easy. These once staple flowers have gone by the wayside as designer perennials going for a hundred bucks a pop and tender tropicals have become the rage.
It’s time to bring the glads (also known as “the sword lily”) back, and I’m here to help.
Call them “glasiolus,” “gladiolas,” “gladioluses” or just simply “glads,” these are plants that are easy to grow, well-suited for our local soils and downright inexpensive—if you aren’t too picky about the colors and types. They can be purchased for as little as fifteen cents per corm (wholesale in lots of 100).
Glads are grown primarily for their flowers and they are one of the more spectacular cuts you can grow. They also are great performers in the back of the garden as they are relatively tall and some are worthy of being specimen plants or planted en masse.
The gladiola requires full sun and will disappoint you if grown in the shade. Our sandy soils suit them just fine. They prefer good drainage and resent wet soils. They should be planted in a different spot each year to prevent problems with viruses and insects that tend to remain in the soil.
The corms—contrary to popular belief, they are not really bulbs—are planted in the spring when the trees begin to leaf. Plantings can and should continue on a weekly basis through mid-June to provide a long season of blooms and extended maturity. Planting depth is about 6 inches for the largest corms. If planted deeper, flowering will be delayed.
If grown in rows, the spacing between the plants will be dictated by the purpose of your planting. Those who end up growing glads for exhibition and shows will plant the rows about 28 inches apart with corms planted on 8-inch centers. If, however, you are simply growing them for cutting and use around the house or to give to friends, then your spacing can be much closer with a reduction of almost half the mentioned distances.
Any loose skins that are on the corms should be discarded before planting. This will enable straight stems to form instead of crooked ones that might be crippled by emerging through the tough husk. Place any that have already sprouted so the sprout will grow straight up, no matter the angle at which you position the corm. If two sprouts are growing at different angles, you can cut the corm between them, making sure you get a piece of the bezel scar on each.
If you are going to try to grow exhibition-size glads, you need to de-eye the corms. This means rubbing or cutting off the side sprouts on the corm and leaving just the big one at the top center. In this way you are concentrating the bulb’s energy on the main spike instead of letting it be divided among two or three spikes.
When cutting, be sure to leave on the largest of the center eyes. Cut out the others using a clean knife dipped in a bleach solution of one part bleach to nine parts water. Let the cut surfaces harden for a few days before planting the corms.
When you are ready to plant the corms, have some markers ready so you can tag the different varieties. It’s helpful to know what you’ve planted once they begin to bloom. If you plan on recycling your corms for a second year, then knowing which variety is which can be critical unless you’re willing to put up with a general mix.
Fertilizer is generally added to the soil prior to planting and it’s best to band the fertilizer to the sides of the planting rows so it doesn’t burn the emerging roots. As organic fertilizers are the longest lasting, they are by all means the best. Supplemental additions of liquid organics can be applied during the growing season, but be careful to limit the amount of nitrogen you use. Overdoing this element will result in plenty of heavy foliage that will weigh down the plant and provide few flowers.
A fertilizer with the ratio of about 1-4-2 (or 8-32-16 to be more precise) is a good goal to shoot for at about 3 to 4 ounces per 100 square feet per application space at about every two to three weeks.
Glads need about an inch of water a week, so if it doesn’t rain, then add what’s needed to make up the difference. Soaker hoses or drip lines are perfect because they keep the water off the foliage and emerging flowers. But you can also run the water down a shallow trench along the line. In the heat of the summer, the plants will enjoy some overhead watering that will cool them down, but make sure it’s done in a manner that allows the plants to have dry foliage and flowers before the sun begins to wane in the late afternoon.
Aphids and thrips are the insects to watch out for and both can be controlled with vigilance, organic and water sprays, and beneficial insects. The roots of the plants can be easily damaged, so cultivate gently and use mulches to keep the weeds down.
When you cut bloom spikes, leave at least four leaves on the plant so the corms will mature properly for next year. Use a sharp knife (never a scissors or pruner) and cut the foliage downward at a slant. The bulbs mature about six weeks after blooming. And if you’ve cut the flowers off correctly, no seed will set.
The bulbs can be lifted as soon as all signs of growth have stopped and there doesn’t seem to be any benefit in waiting for frost or for the foliage to turn brown. You can use paper bags (not plastic) to separate your varieties and label the bags, or bag them en masse if you don’t care how the planting comes out next year. Remove the foliage as you do your bagging, cutting the foliage about a half inch above the corm.
The corms can be cleaned by hosing them off or by dunking them in a bucket of clean water. Some may want to add a fungicide into the dipping process as a bit of insurance. Allow the corms to dry in a bright, warm spot for about three weeks. After this time, you should be able to twist off the old corm, retaining the new one.
The corms can be stored in wooden boxes with screen bottoms or a plastic box that has a screen top you’ll add. They should be stored right-side-up so the sprouts that form will grow straight up. Storage should be at about 40 degrees, so an unheated garage or an unheated basement or root cellar is perfect. And yes, some of us still have root cellars.
Lots of companies and catalogs offer the most common glad corms. If you find some referred to as a “utility mix” or “field run,” these are the unsorted picks from the growers field that are not graded or sorted. Mixes like this can be very inexpensive and may, from time to time, yield some surprises.
For more interesting varieties, check out the website of the North American Gladiolus Council at gladworld.org. Click on the suppliers icon on the right side of the home page and you’ll find a whole world of incredible offerings. There’s also lots more cultural information on this site as well, plus other glad growers who will be happy to help you out.
Old House Gardens (oldhousegardens.com) is also a great source for information and heirloom glads. And don’t forget your local garden center. Virtually all of them will have pre-packaged glad corms and some of the larger local retailers may have as many as a dozen or more varieties.
Last bit of growing advice: don’t forget to stake your glads once they get to flowering size.
So, opportunity is knocking again. And even if you don’t save and replant your corms, this is still a fun and inexpensive plant to work with. Get glads. And keep growing.
Andrew Messinger has been a professional horticulturist for more than 30 years. He divides his time between homes and gardens in Southampton, Westchester and the Catskills. E-mail him at: Andrew@hamptongardener.com. The Hampton Gardener is a registered trademark.


 27east on Apr 8, 2010