


Drooping leaves like those on the Dracaena, left, and Dieffenbachia, right, can be a sign that repotting is needed. ANDREW MESSINGER
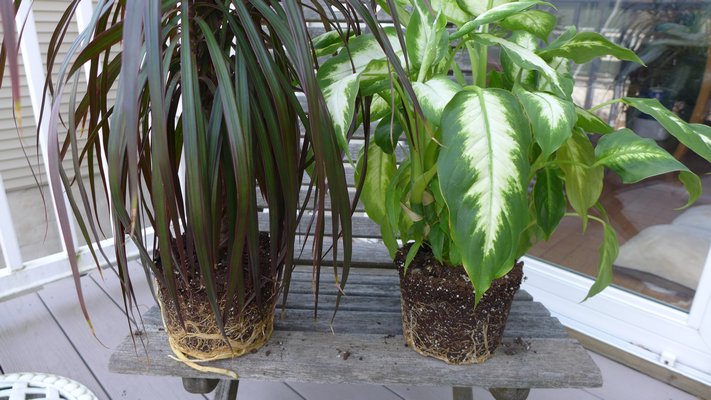
Note that the roots of the Dracaena, at left, are going in circles with little soil visible. The Dieffenbachia roots are much thinner, but this plant will grow much faster and will remain fully leafed out if repotted. ANDREW MESSINGER
The Dracaena needing repotting is in a 6-inch "short" pot. At the very minimum it needs a pot 1 inch larger in diameter and depth. The plastic pot on the right is 8 inches wide. The decorative terra cotta next to it is 7 1/2 inches. To the right of a plant is a 7-inch clay pot and on the far right a 6 1/2-inch plastic pot. Which would you use? The terra cotta has both the right depth and width, allowing for another year of growth plus added aesthetic appeal. ANDREW MESSINGER

Just before Christmas I decided that it was time to replant my dining room. It has a large, 15-foot-long by 8-foot-high window and, with its southern exposure, it’s always been a great place for growing plants. The flora goes through stages, though, and it’s been populated with amaryllis some years, orchids some other years and mixed foliage plants at other times. But the plantings were a bit sparse at the end of 2015 and I wanted to add some greenery and life to my blue winter.The following week I was in my favorite discount garden center and they had some pretty great deals. I picked up a few dieffenbachias (Dumb Cane), a few Dracaena marginatas and a half-dozen florist’s cyclamens. You’re going to have to wait to hear about the cyclamens, but they’ve been quite an experience and a plant I’d never grown indoors. The dieffenbachias and dracaenas were all in 6-inch plastic pots and from 12 to 18 inches tall. For $3.99 each they were real bargains, the kind I always tell you to be wary of, and home they went.
For the better part of three months they stood atop their plant stands and gave just the right look and feel to the otherwise white dining room. But as spring approached I noticed some leaves beginning to drop and the plants seemed to need water nearly every other day instead of once a week. That with the foliage drooping gave me all the signs and I knew that my bargain plants needed repotting. I watered them well, popped them out of their plastic pots, and sure enough the roots were filling the pots and going round and round in circles with little soil visible. The plants were well in their way to becoming what we call “root bound.”
You may have the same thing going on with your houseplants. They know it’s spring, they want to grow in spite of you, and they probably need larger homes. We call these homes “pots,” and repotting can be incredibly simple. In most cases you just water the plant well, pull it out of the existing pot, then, using two fingers, you tease out the encircled roots to loosen them up. The second step is to measure the size of the original pot, making note of its depth and getting your favorite potting soil and lightly moistening it. Fill the new pot with about an inch to an inch and a half of potting soil on the bottom, and without compressing the soil put the original pot on top of the new soil.
The old pot should now sit about a half inch below the rim of the new pot. Now, with your hands, begin to drop the moistened potting soil into the space between the two pots and continue doing this until the entire void between the pots is filled to the rim of the old pot. Soil will also fall into the old pot, but don’t worry, you’ll use this soil shortly. When this is done, lift both pots off the table or bench about an inch, then tap it against the table. This will allow the soil to fill any voids. Gently, GENTLY, compress. If you need to add a bit more soil this is the time to do so and gently tap the pot one more time.
Now, carefully lift the old pot from the inside of the new pot. Since the soil is moist it shouldn’t collapse as long as you are gentle. When you have the old pot out you can take the plant and ease it into the new pot. Even though you have opened up the root mass a bit the general shape should still fit right into the space left by the original pot. There may be some voids and spaces, so again tap and gently drop the potted plant to help settle the soil.
When you’re done there should be a half inch of space from the top of the soil to the rim. Now you can water in the plant and the water will continue to help settle the plant into the new soil. Don’t add fertilizer and don’t overwater. The next time you can just add water to the saucer under the pot and the soil in the pot should wick up the water. Any water that’s left after a half-hour should be removed.
But let’s go back to the beginning for a moment. Have you given any though to what kind of a pot you are going to use and what potting soil you’ll use? And do you know if the plant that’s in the pot is one that likes or needs to be pot-bound in order to flower? Some do.
So do a little research first. Some plants like amaryllis do best if they are in the same pot for two to three years. The bird of paradise (strelitzia) will flower only when pot-bound and the same is true of most clivia. Orchids are a whole different story, as is their need or lack of need to be repotted, so we’ll cover that plant another time. Suffice it to say though that orchids need very different soils, if they need “soil” at all, and some would also say they need very different pots.
And just as some plants will drop leaves and droop, letting you know they need larger pots, over-potting can be disastrous. When you repot a plant and put it in a pot that’s too large you create a situation in the new pot where there is excess soil that absorbs moisture. Since the roots don’t fill this soil quickly, the water remains in the pot, and can create a water-logged situation where certain pathogens thrive and end up killing the plant from various root rots. This is why the rule of thumb is to increase pot diameter and depth by 1- to 2-inch increments per potting. But again, what pot to use? Will it be plastic or clay? And does it matter?
Until the 1960s decisions about what pot to use were pretty easy. Plastics had not yet made the scene, so clay or terra-cotta was the pot of choice. And clay had its very good points and some drawbacks. The good point was that clay allows the plant’s root zone to breathe. The porosity of the clay allows moisture to evaporate or wick out from the sides and bottom, so it was relatively hard to overwater a plant, a blessing for those who tended to be heavy-handed on the water. But clay is heavy and easy to break. That meant it was difficult and expensive to ship and when you dropped a clay pot or whacked it with something, well that was usually the end of the pot, if not the plant.
Next week, more on the pots for potting, my particular prejudice and why all potting soils are organic, not just the ones that have “Organic” printed on the bag. Until then, examine your houseplants, get the potting soil you need and find out the rest next week. Keep growing.
More Posts from Andrew Messinger


