


The heat and drought of the summer finally broke late last month with a deluge. After weeks of cooking in the sun and virtually no precipitation, the area finally received between two and four inches of rain and several days of cloudy skies.
As a result, within two days of the heavens opening up, lawns began to respond and miraculously (not really) green up. Well, most areas greened up.
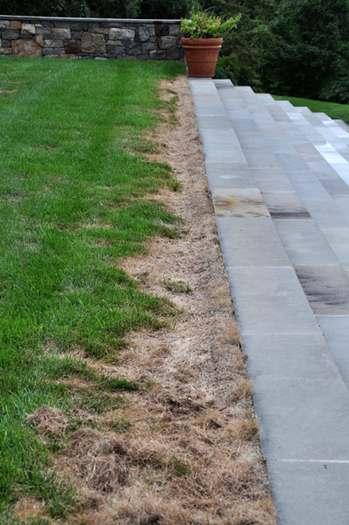
The intense heat and bright sun did quite a job on grassy areas that once grew up to pavers, sidewalks, roads and steps. These landscape elements became heat sinks, retaining the heat well into the night. And nearby turf simply had no chance as the dry heat sucked all the water out of the soil, leaving the root zones as little more than dust.
Even hardy grasses that had gone dormant were damaged. Even when the soil was rehydrated, only a sprig here and there recovered.
The results of disease also became sadly apparent as the green-up began. Many lawns that had simply survived and not thrived during the drought jumped back to life, but generously spotted with ugly dead spots that simply wouldn’t recover.
With this destruction it’s tempting to think that your lawn isn’t worth the effort. But a little bit of seed, the right application method and some patience can bring that lawn back to its previous self. And now, right now, is the time get the work done.
To get this project done properly you need to understand a few things about grass seed and grass plants. First, depending on the type of seed you use, it will take a minimum of a week for you to see any results. Keep in mind though that it can take as long as three weeks, so patience in this endeavor is a true virtue.
Grass seed needs several elements to germinate and then a few more for sustenance once the plants starts to grow.
Once the seed is put down, it must come into contact with the soil so moisture is maintained around the seed to stimulate germination. If the seed is too deep, it will rot. If it’s too shallow, it will dry out. Just right is when the seed is covered with about a quarter of an inch of soil and that soil is kept moist, not dripping wet, until the plants emerge and begin to root.
Mother Nature offers help in the form of rain and dew; you offer help in supplying the rest of the water. A light mulch will keep the sun off the soil and seeds, reducing your need to water. But the mulch later should be thin—only a quarter to an eighth of an inch thick and evenly applied.
What to use as a mulch is also important. You don’t want to use hay or straw because these can contain the seeds of whatever was in the field when the crop was cut. You can purchase seed-free hay and straw where the tops are cut and the material bagged for use as mulch. This stuff is great. If available, you can also use salt hay, which contains no weed seed but this material is harder and harder to find.
There are also mulches composed of recycled newspaper and other materials that come in bags or boxes of green pellets. These are applied over the soil, then water is applied and the material expands and spreads out to form a mulch layer. Again, don’t over apply this mulch or you’ll create a layer of mush, not mulch. The package has directions on it for the proper application rate.
Now let’s step back. The first prep step is in getting the seed bed ready. If the soil is in good shape and no filling is necessary, I simply remove the dead grass blades with a thin tine or fan rake. Then I use a special spiking tool that I roll over the soil to loosen it up to a depth of about half an inch.
I use an older tool called a “Gardevator,” which is very hard to find, but a new one called the “Grass Stitcher” that I just tried is excellent and easy to use. It comes in two sizes but the smaller one is nearly $100, and while that’s not cheap it does all the prep work in just a few passes.
This step aerates the soil and also creates a rough surface (seed bed) that the grass seed will fall into—the cracks and crevices are perfect settling places for the grass seed. The seed is then spread (by hand or a mini spreader) over the area and it settles on the soil.
Next, I very gently pull the spiking tool over the area to mix the seed into the soil. Too much pressure on the tool will damage the seed, just the right amount will mix the seed with the top quarter of an inch of soil, providing good seed-to-soil contact.
The seeded area is then tamped lightly. You can buy a tamper for just this purpose or you can use a wooden board (a piece of 1-by-6-inch board works well) that can be pressed against the soil.
The seeded area is now watered lightly but thoroughly and the hay or straw mulch is added. If you are using the cellulose mulch that is applied before the water, then it is watered in. Once wet, the cellulose mulch will expand and spread out.
The fertilizer is then worked into the soil when you rough it up prior to applying the seed. There’s really no need to use a fertilizer for small areas but if you feel the need, a very small amount of seed-starting fertilizer can be added to the area before your work begins.
Regular lawn fertilizer will not work as it is too potent for the emerging seedlings. Special starter fertilizer is what you should be using and only at the recommended rate.
At this point, keeping the seed bed moist until full germination takes place is critical. For weekenders, this is often hard to do. But if you water well on Sunday and apply just a smidgen of extra mulch (pray that we don’t get a heat wave), you may luck out.
Builder seed mixes will germinate the fastest. This type of a mix is a cheap one that builders and landscapers use to give a quick green-up, but the types of seed used result in a very inferior lawn. A premium blend will include bluegrasses, fescues and rye grasses and each will germinate at different rates with the rye germinating first, giving the other seeds shelter from the sun.
The seeds will germinate best when the nights are cool and the days warm. It will take from 20 to 40 days for the patched areas to fill in and they may not really look fully normal until next spring. Keep falling leaves off the repaired areas as this will keep rain and light from reaching the seed and emerging grass plants.
There’s no need to remove the mulch if you’ve mulched properly. You can begin mowing again when the grass plants are two inches tall. Weeds should not be a problem but if you are applying a broadleaf herbicide to your lawn for weeks in other areas, read the directions for newly seeded areas to see what precautions may be necessary.
Next spring the repaired areas will look a bit greener than the older section of lawn, but after a few mowings you won’t know which is which.
Keep growing.
More Posts from Andrew Messinger


