


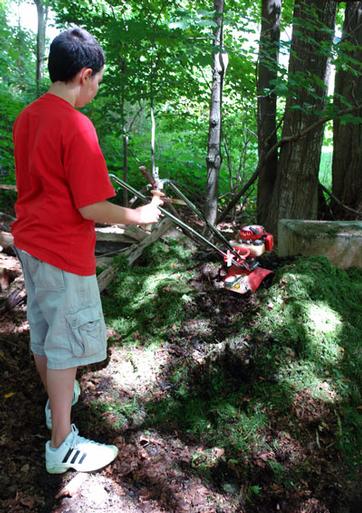
The Hampton Gardener’s son tending to the family’s compost heap.
A few years ago I wrote a series of columns on composting. It’s a topic very dear to my heart and I think very important to every serious gardener no matter your garden’s size. Because so many of you have written to me in the past months about being new gardeners or becoming reinvolved so you can grow your own vegetables and fruits and regain control of your lawn from chemical fertilizers and pesticides, I think it’s time to revisit the compost pile to see what it’s all about.
A question was once put to me by a student in a general gardening class. She had recently purchased a home in Southampton and was learning the ins and outs of home horticulture and wanted to know what I thought was the single most important thing she could do for her gardens. I couldn’t give her a quick answer because my mind kept on coming up with long lists. Then, several days later, the light bulb went off and I had my answer—compost.
Making your own compost at home is probably the single most important thing you can do to help your garden as well as it being your small contribution to saving our planet.
I then thought back to nearly 30 years ago when I was visiting a large greenhouse grower in Patchogue who was very proud of what at first appeared to be a field of dirt piled neatly in rows. There were hundreds of cubic feet of these rows and the grower beamed as he touched the soil and repeated several times “Pure gold, ya know it’s just pure gold.” He’d had an idea back in the mid-70s and approached several local municipalities with a proposition. Since the age-old practice of burning fallen leaves had been outlawed, he offered to take the leaves off the town fathers’ hands, saving them plenty of labor costs and space at the dump. Can you believe that we used to just bury our leaves and lawn clippings at local dumps? With careful tending he was astounded to watch these leaves decompose and almost miraculously turn into the richest garden humus he’d seen, complete with an abundance of long hungry worms. He now had more than enough humus to add to his garden and planting beds, turning what was once useless sandy soil into incredibly deep, homemade topsoil.
These days, however, we not only can’t and don’t burn our leaves, but we can no longer put our grass clippings in plastic bags and bring them to the dump, but again we’ve inadvertently struck gold as fresh grass clippings are another key ingredient to the composting process. In fact, in the right proportions, there’s nothing that will give you good rich humus quite as fast as fresh grass clippings mixed with fallen maple leaves and some small
twigs. Throw in your kitchen scraps (no meat and bones please) along with spent annuals, canna foliage, corn stalks and all types of garden refuse and you’ve got some great stuff to cook.
That’s right, I said cook.
What our enterprising grower did was a simple process known by all good organic gardeners as composting. It’s simple, takes only an ounce of effort (if you start right) and yields results that will give you a gardening soil unlike any that you can buy and a better buy than anything you can get. And this seemingly magical soil that you can create will add some of the most important building blocks to soil and plant life that you can possibly imagine. Want to see sandy East End soil turn into plant friendly, nutrient rich black gold?
Compost!
You can start now, it’s a perfect time of the year, especially with the warm weather we’ve been having. Compost is nature’s way of recycling energy and nutrients. It’s often referred to as the “Organic Cycle.” Living green plants convert solar energy into chemical energy through the process of photosynthesis. Chemical energy is tied up in the tissues of plants and passed on to man, animals and other living creatures. When life forms die, their tissues are given back to the soil. Soil organisms literally chew up and decompose these organic residues, reducing them back to their elemental forms so that essential nutrients can be made available to plants. Microorganisms serve as nature’s digestive system and give life to the soil. This basic cycle of life plays a vital role in both soil formulation and plant nutrition. Humus, the end product from composting, is an essential soil ingredient. Organic materials which accumulate around a home (leaves, grass clippings, garden and yard residues such as small twigs and the season end gleanings from flower and vegetable gardens as well as many kitchen wastes) all contain valuable energy that can be recycled into rich humus in just weeks or months (depending on the materials composted and the method used) although a well cooked compost pile should take six to nine months.
With proper planning you can set up several piles so that one is always ready to be used. It just doesn’t make sense for you to bag up all of those beautiful maple leaves, corn stalks and lush lawn clippings and trash them, then in the spring, go out and buy bags of topsoil, manure and peat moss when you can recycle what you’ve got right now and end up with something just as good and probably better right in your back yard.
And no, a compost pile properly tended doesn’t smell and won’t attract rodents.
There are six primary considerations or operations in good scientific home composting:
1. Collection of organic materials.
2. Construction of the pile(s).
3. Maintaining the pile.
4. Proper amounts of moisture.
5. Adequate air supply.
6. Adequate supply of soil-microorganisms, something that mother nature used to supply in her own sweet time, but now you can buy them at the local garden center.
It’ll take this week and next for me to cover the steps and explain the process to you, but start your composting now by following these directions (but also keep in mind that most gardeners seem to waiver from the scientific method, which is fine as long as your method works as well, or better).
Start collecting organic materials. Leaves (but not pine needles), grass clippings, garden wastes, manures (not treated with chemicals) and many kitchen wastes (excluding meats) are all excellent materials for recycling in a compost pile. Collection of the leaves and yard wastes can be made easier by using a burlap or plastic tarp that can easily be pulled about the lawn without doing any damage. A wheelbarrow is also fine, but won’t hold as much. It’s surprising how much composting material accumulates in the kitchen and some gardeners like to keep two pails for garbage. One will go to the compost pile while the other will follow the more traditional route. Materials such as coffee grounds, eggshells, vegetable scraps, orange peels, apple cores, melon rinds etc., and house plant sheddings can go in to the compost pail, but never include meat scraps as they will attract the wrong element.
Other materials that can be added are hay, straw, shredded branches, twigs, sod trimmings etc., BUT and this is an important BUT, plan on keeping your pile as far from the house as possible preferably in a hidden or out-of-the-way area.
A well-kept compost pile should never, ever smell or attract rodents and while they may send up wisps of steam in the dead of winter, they are rarely aesthetic works of art. It’s usually desirable to enclose your compost pile in order to keep the materials well contained and to conserve the generated heat. Some of the possibilities to consider are: wire bins made of chicken wire (This type of structure will last only a couple of years unless you upgrade the wire with a stronger material), a three-sided enclosure made of concrete blocks, wire screen or pressure-treated wood or a rot resistant wood such as locust or white cedar or prefabricated bins, which are usually made out of plastic and may be round, angled, or square with removable sides. This type of bin is acceptable only if you are doing small amounts of composting and don’t think you’ll have more than a 55 gallon drum’s worth of stuffing for each cycle.
Organic materials should be added to the pile in 8- to 10-inch layers. It’s preferable to mix coarse materials such as leaves, garden and kitchen waste with the finer materials like grass clippings, manure or shredded materials. Finer matter alone tends to compact when not mixed thus making it difficult for air to penetrate the pile. The result is a slow cook with reduced microorganism activity that could simply die and leave you with a useless pile. Remember, mix green materials with brown (carbon with nitrogen) to get off to a good start. Each of these 8- to 10-inch layers can be “activated” with either a commercial compost activator or a handful of 10-6-4 (preferably organic), but there is some debate if this activation is really necessary. In this way, the cooking process in which the organic materials are broken down is assured through the entire pile instead of only in spots.
Moisture should be added to each layer. It’s helpful to stir materials around while sprinkling (not drowning) them. All surfaces should be moist, but not dripping wet. In another week or 10 days, add water again to the point of runoff and you’ll be amazed as the pile seems to absorb nearly ten times more water than the previous week.
Well, that’s enough to get started. Next week well go over maintaining the pile, maintaining the proper amounts of moisture, air and microorganisms. In the mean time, keep piling and keep growing.
Andrew Messinger has been a professional horticulturist for more than 30 years. He divides his time between homes and gardens in Southampton, Westchester and the Catskills. E-mail him at: Andrew@hamptongardener.com. The Hampton Gardener is a registered trademark.


