


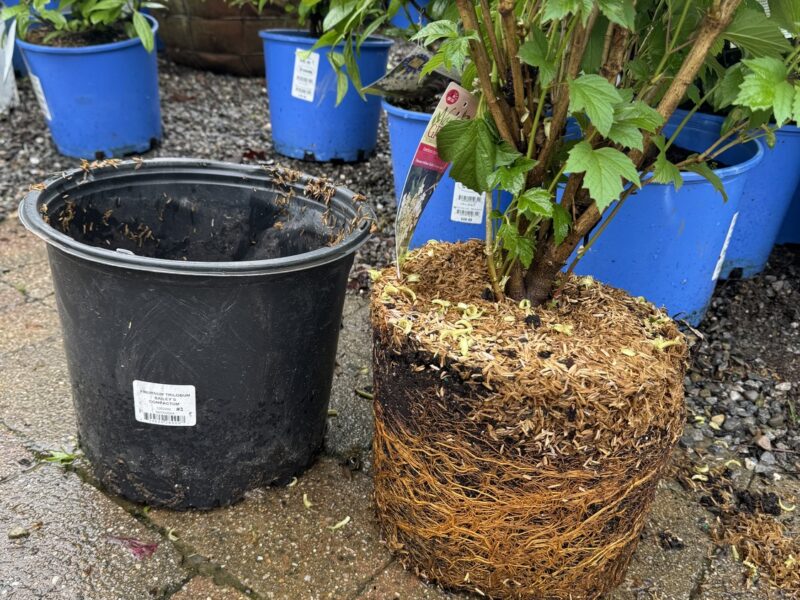

This viburnum, in a 3-gallon pot, was easily extracted from the pot but the mass of tight roots going round and round are probably a minor issue. They can be teased out with your fingers and/or cut vertically with a knife (second choice) but this plant should do well if properly detangled and planted properly. ANDREW MESSINGER

This 8-inch hanging basket of petunias will only last a month more before the roots totally fill the basked. The first clue that its pot-bound will be that it needs watering several times a day. When this happens just pop the plant out of the basked, loosen the roots a bit then repot into a 10- or 12-inch basket where it will be fine for the rest of the summer. You can also give the plant a light pruning at transplanting time and in a few weeks it will rebloom like crazy. ANDREW MESSINGER
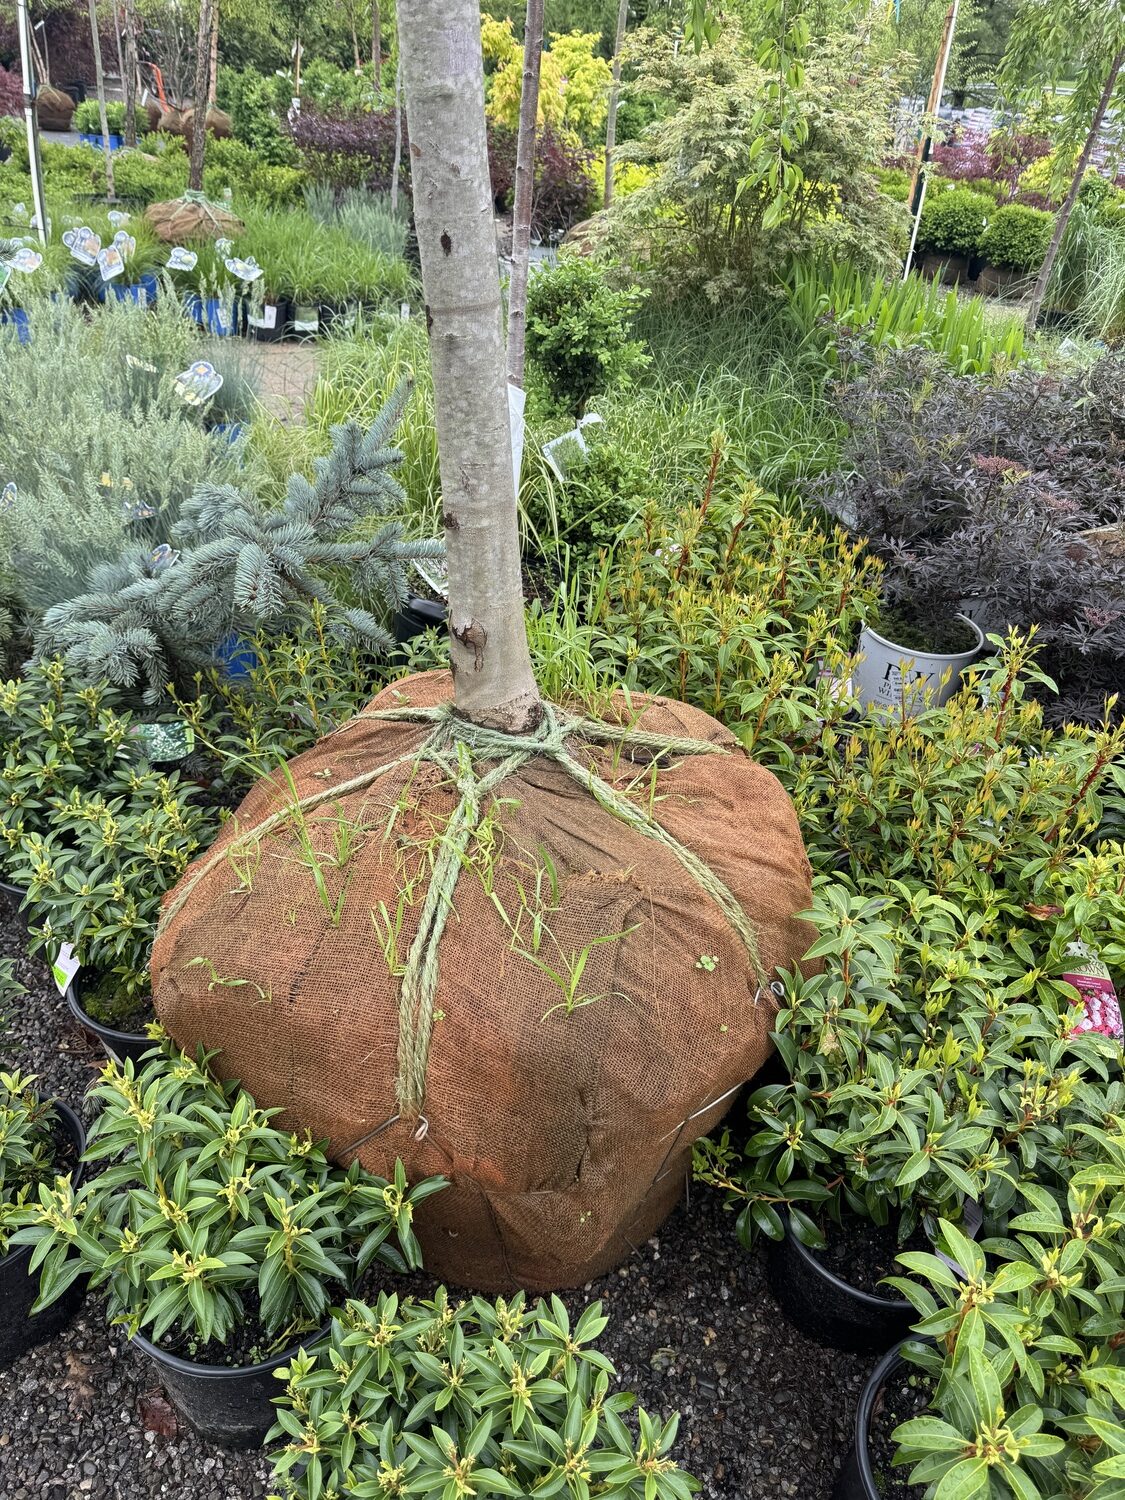
This balled and burlapped tree with a lower wire cage has one clue that might make you think twice about the purchase. The grass growing through the burlap could be an indication that the tree was dug months ago, or longer. In this case I’d ask what the guarantee is. B&B’s are often guaranteed for a year. Ask for two in this case. ANDREW MESSINGER
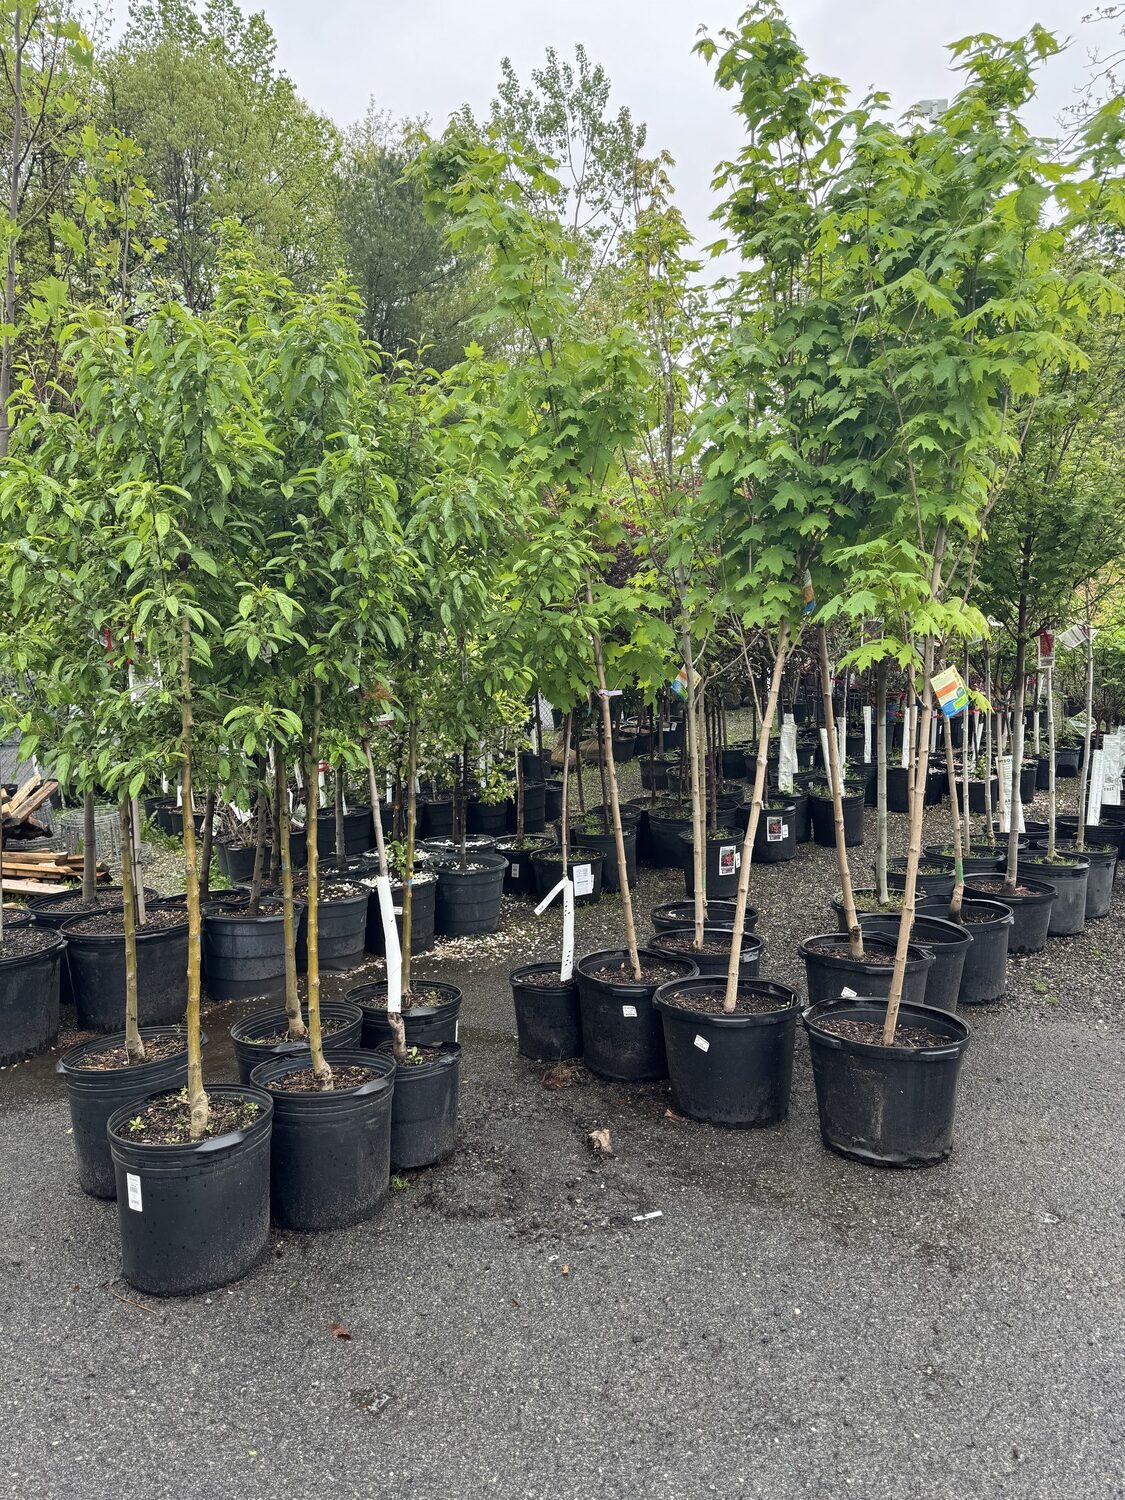
Would you buy an 8-foot-tall tree that’s been grown in a nursery pot like this? The roots are certainly pot-bound and tight, and the tree has probably been in the pot for a couple of years. Not all necessarily bad if it’s properly root pruned and cared for. I’d want a two-year guarantee. ANDREW MESSINGER
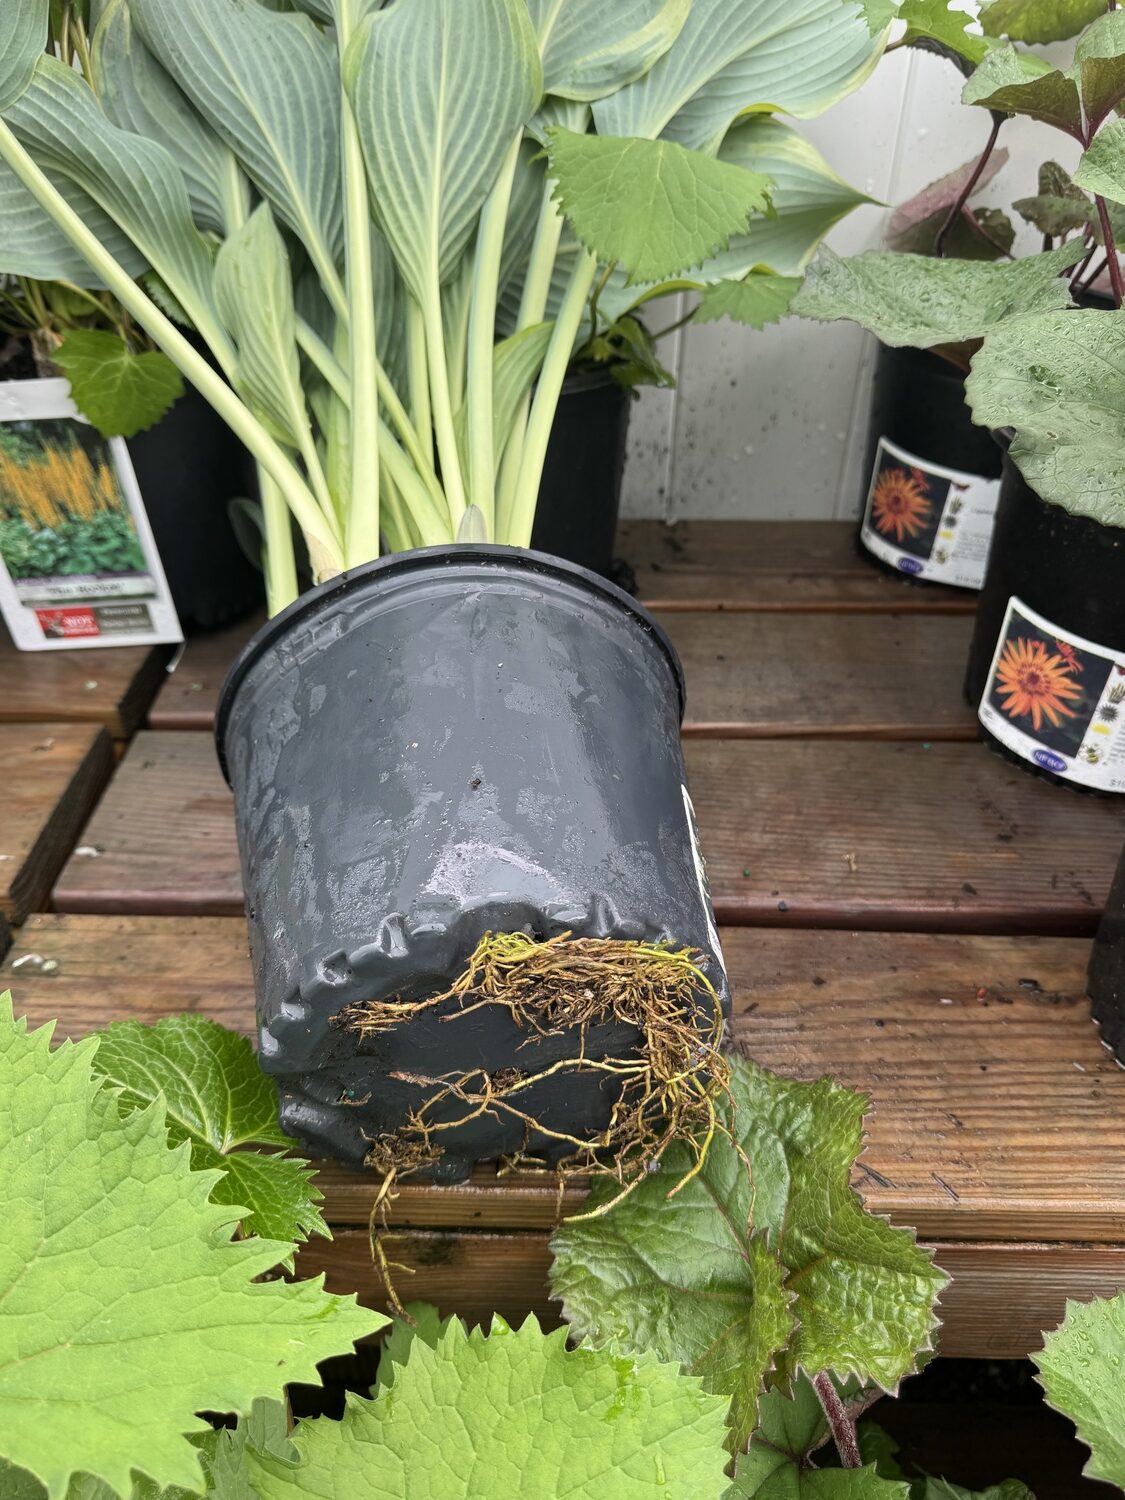
Here’s a hosta in a nursery container with roots emerging from each drainage hole. Hostas are pretty resilient plant though, and while the pot may have to be cut to extract the plant if the roots are properly teased out and properly planted, it should thrive. Removing a few of the leaves can also ameliorate the shock of the root pruning.
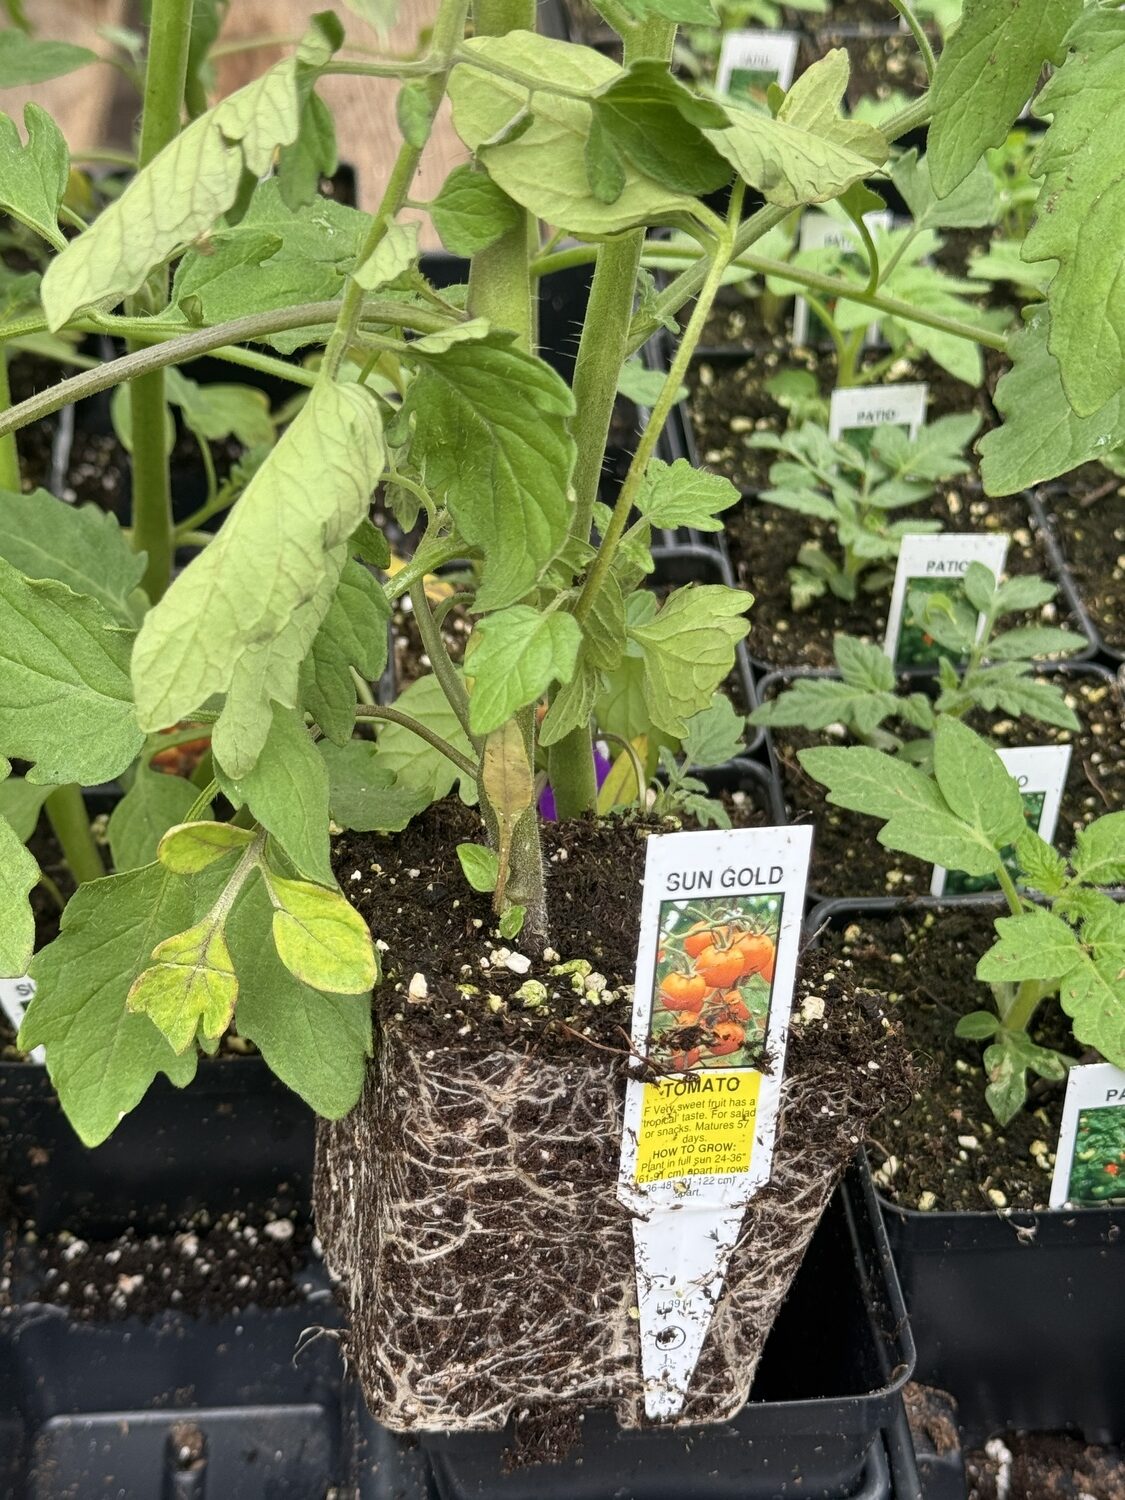
This tomato plant was in a 4-inch-square plastic pot. While there seem to be lots of roots they are loose enough to be easily teased out prior to planting. One thing about tomatoes — they can never be planted too deep. ANDREW MESSINGER
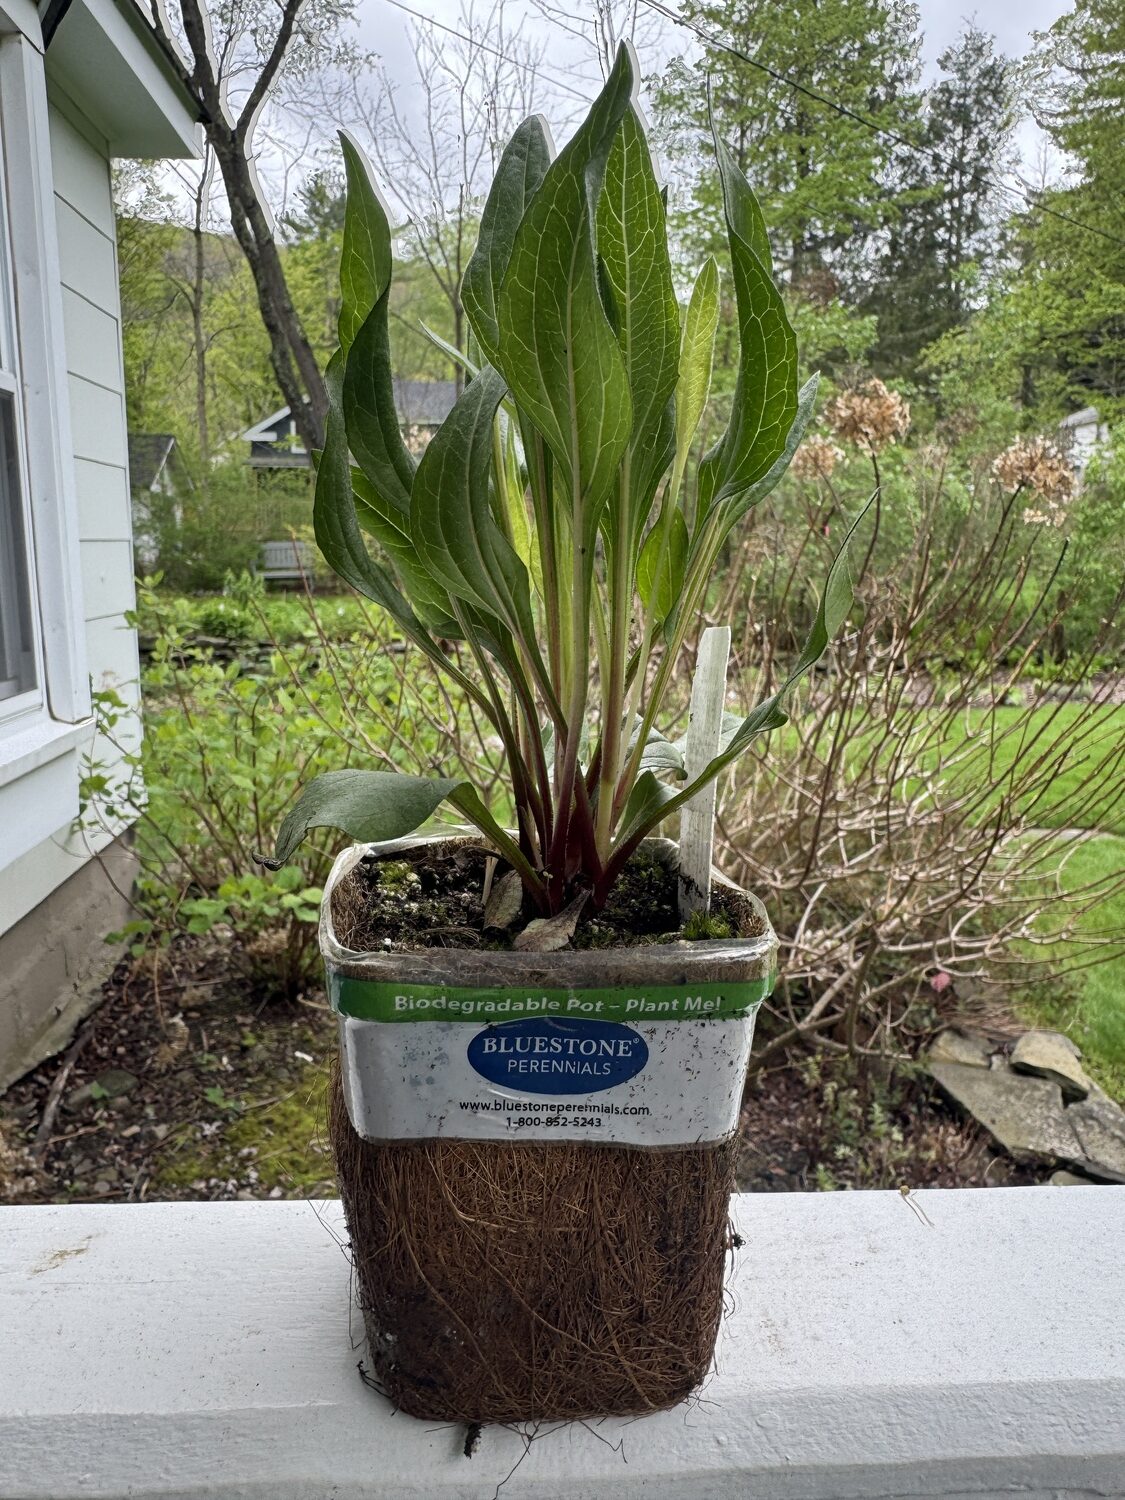
This perennial Echinacea has been grown in a coconut coir pot that’s 5 inches tall and 3 inches wide. What looks like roots on the outside is just the coir fibers. Since the coir breaks down so slowly it can inhibit the root growth. You can try to extract the plant from the “pot” or simple remove the top wrapper and slit each side, top to bottom, with a utility knife and then plant. When planting, the top of the pot should be the top of the soil level and not covering the crown. I’ve added coir pots to my compost, and they can take up to two years to totally break down. ANDREW MESSINGER

As the Memorial Day weekend quickly approaches the garden centers and gardens of the Hamptons once again spring to life.
Weekenders and renters will stream out from the great metropolis and swell our roadways, and local garden centers will shortly be full to the max with annuals, perennials, trees and shrubs. Yes, it’s time to get out and shop, but with some tips that you may find helpful.
Virtually all these tips relate to what these plants are grown in — their containers. The black plastic nursery pots, the gray plastic cell packs and even the twine-bound, balled and burlapped larger trees and shrubs offer clues to how these plants have been cared for, what to avoid, and what to do with them when you get them home.
Starting with annuals in cell packs: These plants are usually started back in January as the flats of annuals are mechanically seeded then placed in long plastic or glass greenhouses where they are grown on to a salable size. The first thing to look at is how many plants are sold per cell pack. These packs can come in groups of four, six or eight cells so when you look at the price per pack take a closer look and do the math to see what the actual price per plant is and not the cost of the pack.
Next, extract one of the plants from one of the cells and inspect the roots. In many cases you’ll find the roots have totally filled the cells in a mass of white strings that fill the cell. For annuals this is fine and to be expected. Many of you will simply transplant these into larger pots or install them directly into garden beds. But there’s one important preplanting step.
No matter how you use these plants it’s critical that you do some painful (only to you) root pruning. This will result in the quick stimulation of new roots that will venture into the new soil you’re planting into. You don’t need to be gentle. I’ve seen gardeners use garden shears to cut the bottom half of the root mass off while others will try to tease the root mass out by pulling or cutting them. The goal is to stimulate new root growth, and this in turn will actually allow the previously cell-encased petunia, marigold, dahlias and other annuals to grow and thrive.
If you’ve bought plants by mail or online they may arrive in coir pots. Coir is the fiber of the coconut shell. While this material is organic it is quite persistent and breaks down over months, not days. I like to slit these pots down the sides to encourage the roots to “explore,” or simply remove the coir when possible.
Larger plants will be on display in nursery containers. These are usually black plastic containers ranging from pint sizes up several gallons getting as large as 5- and 10-gallon pots. These pots can be reused at home or returned to the retailer for recycling. However, a recent trend toward “branded” pots with brand logos all over the pots is very disturbing. These pots can’t be reused by the nurseries and generally aren’t recyclable. If you’re in the least bit environmentally conscious please complain to the retailers about these branded pots, and let’s see if we can reverse this trend. It’s just greedy advertising at an environmental cost.
When purchasing plants in nursery pots there are few things to watch for. It’s important to know if your plant is totally pot-bound. There are two ways of doing this. First you can grab the plant by the crown or stem and try to extract it from the pot. If the soil begins to fall off this is actually a good sign that the plant hasn’t been in the pot for too long and the roots are in good shape. On the other hand, if all you see when the plant is extracted is a tight weave of roots and not a grain of soil falls from the root ball, there are other considerations.
In some cases, you can’t even extract the plant. When you have it home, use a utility knife to split the pot down the sides. If roots are emerging from each and every drainage hole at the bottom of the pot, this can also be an indication of issues as well indicating that the plant has been in the pot too long.
If the plant of your dreams or needs turns out to be totally pot-bound then the plant will need immediate planting when you get it home. If you can’t plant it right away you need to make sure that the root mass doesn’t dry out — which it will on a bright and sunny day, in hours. In the nursery these plants are usually on drip or mat irrigation systems that keep them continuously hydrated. Garden centers, especially the big box ones, rarely have the staff or facility to adequately water these plants — usually perennials and shrubs — and the plants suffer.
When you get these plants home, get them planted as soon as you can. But there is some prep work that will better ensure that they survive. If possible tease out the roots with your fingers. Don’t be timid or too careful doing this. If this isn’t possible then take the seemingly drastic step of using a utility knife as a rescue tool. I know, this doesn’t sound right, but it is the accepted method to resolve the problem, and it does work very well.
The knife blade should be an inch long or longer if you want to sacrifice an old kitchen knife. Starting at the top of the root mass insert the blade into the roots and soil and drag the knife straight down to the bottom. Always top to bottom and never horizontally. This action severs the roots but also causes most of them to branch and regrow very quickly once the plant is replanted. The only time you want to do a horizontal cut is if the bottom of the root mass is almost a solid core, in which case you can cut horizontally around the outside to remove the bottom inch or so of this tight circle of roots.
Once you’ve made the appropriate cuts, dig a hole using the pot as your width and depth guide. Make the hole a few inches wider and deeper (more for shrubs). Add some soil to the bottom of the hole (2-4 inches of new soil is great), gently place the root-pruned plant in the hole and note where the crown is in relation to the surrounding soil and ground. The crown must be at the same level as it was in the original pot. Overplanting, or planting the crown too deep, can often lead to crown rot and the loss of the plant.
Now backfill with some good or amended garden soil using your fingers to fill in voids and spaces around the sides. Once the plant looks right, water the plant in using a watering can and a biostimulant, but NO fertilizers. Fertilizer can be added in a couple of weeks, either granular or liquid.
When planting trees that are containerized — and these can be from 4 feet tall to 15 feet tall — follow the same regime. However, when purchasing containerized trees look at the shoots and stems to see if there are dead twigs and tips. If there are, this can be a sign that the tree or shrub was not properly watered in the nursery, and the dead stem and twig ends are often signs of root damage. Pass on these, or buyer beware.
You will still see balled and burlapped trees and shrubs (also known as B&B) in our better nurseries and garden centers. I always prefer these to container-grown plants as they are often “fresher” than the containerized plants. There are important things to look for though.
First, shy away from plants in synthetic burlap and balled in poly twine. These don’t degrade once planted. A tree that’s in natural burlap can be planted with the burlap intact as long as the burlap is cut and removed from the trunk and sliced a few times vertically from top to bottom. The burlap will degrade over time, and the roots will emerge through the burlap at the spots where you’ve sliced it. Also remove as much of the twine as you can, but again, if the twine is natural and not poly it will degrade in the soil.
Look for signs that the tree (and ball) may have been dropped or otherwise damaged at some point. This will be obvious if you see that the burlap is compromised, has holes in it and the root soil is “leaking out.” You may also note that some trees are balled in burlap as well as a wire-caged. If the wire cage can be extracted by cutting the cage, remove it. But in most cases these trees are planted with the cage intact but with the burlap treated as noted above.
Larger trees and shrubs obviously need larger planting holes, and in many cases, you’ll want to use a professional landscaper for these installations. Feel free to supervise though and ask questions.
You can spend hundreds to many thousands of dollars for a new tree or shrub. It can take several years for them to reestablish once planted so you can’t simply drop them in a hole, water them and walk away. You may feel less likely to care for a tree you got at a great discount at Cheap Bob’s or Bargain Bennies, but when you spend good money for a great tree, take good care of it. Water well at least every two weeks in the first year and as needed in year two. Keep growing.
Garden Notes
With all the rain last week, things are growing fast. If you are on a fertilizer schedule for your gardens it might be a good idea to shorten that schedule by a week or so to make up for the fertilizer that was leached and not used by the plants.
It’s also been great weather for emerging slugs and snails. Treat for them now or prepare for a summer of the slimies.
Scarlet lily beetles (SLB) are out in full force, so pick them as soon as you see them or give them a quick shot of pyrethrin. Mine were only around for four days but while they may seem to disappear, they never really do. They are great fliers and will drop in from other gardens. Be vigilant and look on the undersides of lily and fritillaria foliage for their 1-inch lines or rows of about 10 eggs.
More Posts from Andrew Messinger


